

Which Of The Following Does Not Allow You To Access The Drawing Units Dialog Box?
Adjusting the Drawing Axes
Adjusting the SketchUp drawing axes makes drawing a 3D model easier in several scenarios:
- Using tools, such as the Scale tool, that modify geometry based on the cartoon axes: When y'all align the edges that you want to modify with the axes, you can modify your geometry a little more than easily.
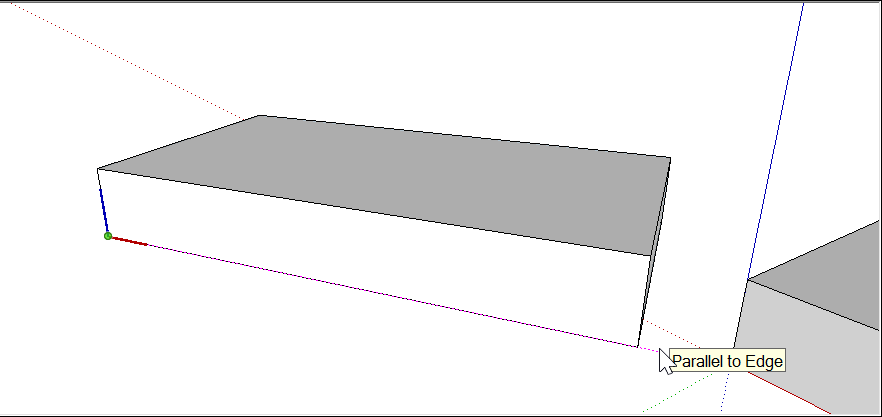
- Tracing a floor plan to create a 3D model of it: When the edges of a rectangular floor program align with the ruby-red and green axes, y'all tin can trace your floor plan more hands. That's because the SketchUp inference engine highlights edges that are parallel to an axis every bit you lot draw them with the Line tool, equally shown in the figure.
- Geolocating a model on terrain (near often done on a TIN, or triangulated irregular network): If yous're cartoon a geolocated model, you lot probably want to marshal the cartoon axes to the key directions that those axes represent. Doing so helps you situate your model on the terrain correctly. (If you're not familiar with these modeling techniques, learn more than about modeling terrain and working with TINs.)
- Casting realistic shadows: If you geolocate your model, you lot tin also see how your model looks at different times of mean solar day. This is some other situation when aligning the axes to the cardinal directions is helpful.

SketchUp enables you to reposition the drawing axes in a few different ways:
- Click with the mouse.
- Marshal the axes to a face.
- Motility and rotate the axes relative to their current position.
Other times, you may want to hide the cartoon axes. For example, in a finished model of a chair or even a business firm or street scene, the drawing axes may distract from your final model, rather than assist you lot draw it.
For specifics about adjusting or hiding the drawing axes, see the relevant sections in this commodity.
Tabular array of Contents
- Moving and rotating the drawing axes
- Resetting the drawing axes
- Hiding the drawing axes
- Aligning the drawing axes with the cardinal directions
Moving and rotating the drawing axes
Here, yous discover detailed steps for adjusting the drawing axes with the mouse or via the options on drawing axes context carte.
Tip: Earlier you adjust the cartoon axes, find the all-time view of your model. Oftentimes, that'due south a corner to which you want to align the axes, either from the height or the side. Y'all can orbit around or select an option from the Camera > Standard views submenu. (See Viewing a Model for a more in-depth look at your viewing options.)
To adjust the axes with your mouse, follow these steps:
- Select the Axes tool (
 ). Yous notice the Axes tool on the Construction toolbar, the Big Tool Set toolbar, or the Tool palette (macOS only). Alternatively, you can activate the Axes tool by choosing Tools >Axes, or context-clicking an empty space on an axis and choosing Place from the menu that appears.
 - Click to identify the axes origin signal. Typically, you want to gear up the origin point at the bottom corner of an object in your model, as shown in the following figure. After you click, a dotted red axis extends from your mouse cursor.
Tip: Later on yous identify the origin or select your first direction, you lot can tap the Alt key (Microsoft Windows) or the Command cardinal (macOS) to alternating the axis orientation leading to your mouse cursor.
- Click to place the red axis. You probable desire to align the red axis to an border in your model. When your red axis placement is aligned to an edge, the SketchUp inference engine displays an on-screen cue, equally shown in the effigy. After you click to place the cherry centrality, another dotted centrality, which represents the green centrality, extends from your mouse cursor.
- Click to place the red axis, or the axis you chose if you employ the tip higher up. You likely want to align the red axis to an edge in your model. When your red axis placement is aligned to an border, the SketchUp inference engine displays an on-screen cue, equally shown in the effigy. After you click to identify the red axis, another dotted axis, which represents the green axis, extends from your mouse cursor.
- Click to identify the green axis. If you adjusted your view to see the edge you want to marshal to the red axis, then the dotted light-green centrality might be hard to come across. However, the SketchUp inference engine displays Parallel to Edge inference when you hover over an edge, even if that edge is subconscious in your current view.
Tip: As yous reorient the drawing axes, keep an eye on the blue centrality. Unless you lot want to flip your model (and the flip and rotate features offer better means to exercise that), brand certain the blue axis points up. Information technology is possible for it to bespeak downward or to the side as you hover the mouse cursor around looking for new centrality points.
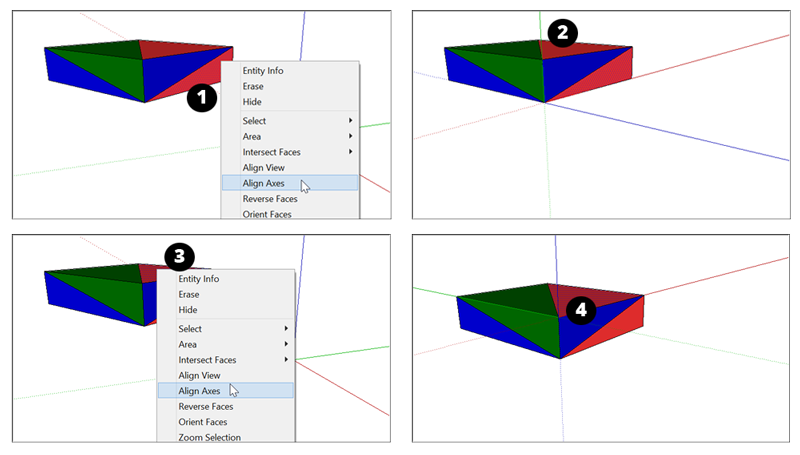
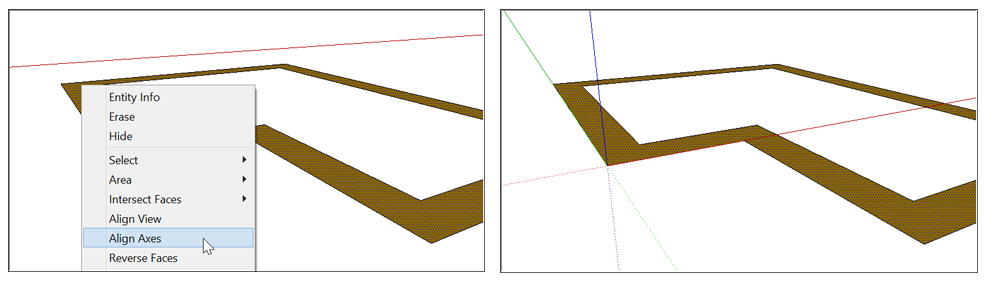
To align the axes to a face, context-click the face up and choose Marshal Axes from the menu that appears.
The following effigy illustrates how the face up you context-click reorients the axes:
- If you select a face in the blue-cherry or blue-light-green airplane (Callout 1), you lot rotate the axes 90 degrees. Detect how the green axis points upwardly (Callout 2) and the blue axis turns on its side, relative to the box.
- If you select a face in the crimson-green plane (Callout 3), the axes don't rotate, but the ground plane becomes aligned to the selected plane (Callout 4).
Because of this behavior, the Marshal Axes command is often useful when you're drawing a 3D model from a 2D shape that'southward currently on the basis plane. Select the 2d face up on the ground plane, and the cartoon axes become aligned to the lower-left corner before you lot first drawing in 3D, every bit shown in the following figure.
To move and rotate the axes relative to their current position, follow these steps:
- Context-click an empty expanse on an axis and select Movement from the carte du jour that appears.
- In the Motion Axes dialog box that appears (shown in the following figure), enter how far you want to move and rotate each axis. SketchUp uses the units specified in your template. (To see or modify the units, select Window > Model Info, select Units in the sidebar on the left, and select a new measurement unit.)
- Click the OK push.

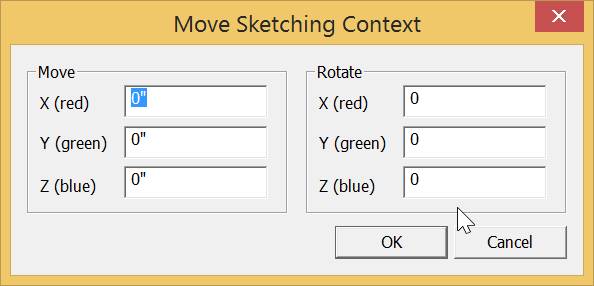
- Context-click an empty surface area on an axis and choose Motion from the card that appears.
- In the Motility Sketching Context dialog box that appears (shown in the post-obit figure), enter how far yous want to move and rotate each axis. SketchUp uses the units specified in your template. (To meet or modify the units, select Window > Model Info and select Units in the sidebar on the left. Then cull a new measurement unit.)
- Click the OK button.
In the post-obit video, see how repositioning the drawing axes works and larn a few tips to assist y'all use the dissimilar methods.
Resetting the drawing axes
If you've been moving the cartoon axes hither and yon, y'all tin move the axes back to their default position pretty easily. Simply context-click an axis and choose Reset from the carte du jour that appears, every bit shown in the figure.

SketchUp enables you to hide the drawing axes in ii ways:
- Context-click an open area on an axis and select Hide from the menu that appears.
- Select View > Axes from the carte bar. When a check mark appears next to the Axes menu particular, selecting this pick clears the Axes card detail and the axes are hidden from view.
To see the subconscious drawing axes over again, select View > Axes, which selects the Axes selection.
Adjustment the drawing axes with the key directions
Each axis has a solid line on one side of the origin and a dotted line on the other side of the origin. The solid blue line leads up from the origin and the dotted blue line leads downwardly. The remaining lines correspond to one of the key directions (north, due south, eastward, west). The following table outlines how each line corresponds to a primal direction, leading from the axes origin point.
| Line | Direction |
|---|---|
| Solid green line | Due north |
| Dotted dark-green line | South |
| Solid red line | East |
| Dotted ruby-red line | Westward |

Source: https://help.sketchup.com/en/sketchup/adjusting-drawing-axes
Posted by: eslickmaint1960.blogspot.com
0 Response to "Which Of The Following Does Not Allow You To Access The Drawing Units Dialog Box?"
Post a Comment